Image Processing
In this toolbox exercise you will learn about the extremely powerful image processing and computer vision library OpenCV. OpenCV’s power derives from the fact that it has tons of algorithms built-in. These algorithms can be used to allow a computer to automatically transform and make sense of images! If you are not familiar with image processing and computer vision, don’t worry! This will be a good excuse to learn about these exciting topics.
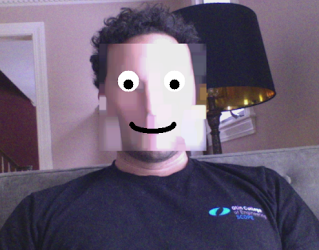
For this toolbox exercise you will create a computer program the processes video either from a file or from your computer’s webcam. Specifically, your program will search for faces within each video frame using OpenCV’s built-in face detector. When a face is found your program will blur it out using OpenCV image filtering functions. Finally, you will draw a funny cartoon face on top of the blurred out face. The end-result will look something like this:
Get Set
Before getting started, make sure you have OpenCV installed. While you can write OpenCV code in both Python and C++, we will of course be using the Python version. The following line will install the OpenCV library and the Python bindings.
$ pip install opencv-python
The starter code will be in face_detect.py and is very minimal for this
toolbox, but it will be good for making sure everyone uses a standard naming
convention for their Python script.
Grabbing Video Frames
To get started, make sure that you can grab video frames from your webcam and display them to the screen. A great place to start is by looking at the OpenCV tutorial on video capture. Note that the tutorial shows you how to grab frames from the webcam and from a video file.
When you are done you should end up with code that looks something like this:
import numpy as np
import cv2

cap = cv2.VideoCapture(0)

while True:
    # Capture frame-by-frame
    ret, frame = cap.read()

    # Display the resulting frame
    cv2.imshow('frame', frame)
    if cv2.waitKey(1) & 0xFF == ord('q'):
        break

# When everything done, release the capture
cap.release()
cv2.destroyAllWindows()
Make sure that when you run this code you see a video feed pop up on your screen that shows the images from your computer’s webcam. If you can’t get this to work with your webcam, you might try loading from a file (see the tutorial for how to make that modification). In order to quit this program you need to press the “q” key after clicking on the video window.
Make sure you understand what is going on in the code. Of particular
importance is the cv2.waitKey command and the cv2.imshow command. The
OpenCV documentation for user interface
elements has
more information on these. Please note that calling cv2.waitKey periodically
is important to allow OpenCV to display images and process window events. If
you don’t call it, then you will not see any images show up.
Detect faces!
OpenCV has a pretty good built-in face detector. The specific algorithm that the detector uses is some variant of the Viola and Jones face detector. Check out the research paper that introduced the method if you’d like to learn more.
In order to load the face detector, you will have to load haarcascade_frontalface_alt.xml, an XML file that describes the faces the detector is looking for. You can download the file directly here.
To detect faces, before you start grabbing frames from the video, instantiate the face detector. Use the filepath of where you put the XML file, for example in your Downloads folder:
face_cascade = cv2.CascadeClassifier('/home/ben/Downloads/haarcascade_frontalface_alt.xml')
Or you can put the XML file in the toolbox folder alongside face_detect.py, so you don’t need to provide a path:
face_cascade = cv2.CascadeClassifier('haarcascade_frontalface_alt.xml')
After grabbing each frame, run the face detector to get a list of faces in the image and then draw a red box around each detected face:
ret, frame = cap.read()
faces = face_cascade.detectMultiScale(frame, scaleFactor=1.2, minSize=(20, 20))
for (x, y, w, h) in faces:
    cv2.rectangle(frame, (x, y), (x+w, y+h), (0, 0, 255))

    # Display the resulting frame
    cv2.imshow('frame', frame)
    if cv2.waitKey(1) & 0xFF == ord('q'):
        break
Note that the bounding box of the face is specified for each face by:
- x = left edge in pixels of the face
- y = top edge in pixels of the face (as y goes up you move down the image)
- w = width in pixels of the face
- h = height in pixels of the face
Blurring Faces
Next, you will use OpenCV’s filtering routines to blur out the face.
Specifically you will be using the function cv2.dilate to blur out the face.
First, at the top of your file (right after you create face_cascade) create a
NumPy matrix which controls the degree of blurring (the larger the matrix, the
more blurring):
kernel = np.ones((21, 21), 'uint8')
Next, in the loop where you draw the rectangles over the faces, use the kernel to blur the image
for (x, y, w, h) in faces:
    frame[y:y+h, x:x+w, :] = cv2.dilate(frame[y:y+h, x:x+w, :], kernel)
    cv2.rectangle(frame, (x, y), (x+w, y+h), (0, 0, 255))
Make sure you understand what the dilate function is doing by checking out
the
documentation. You
can modify the blurring by using a larger kernel (e.g. kernel =
np.ones((40, 40), 'uint8')). You will probably want to comment out the code
that draw the rectangle at this point.
Draw a face!
As a final step, you should add a second loop over the detected faces to draw a cartoon face on top of the original face. A few tips:
- Make use of OpenCV drawing primitives.
- Each shape you draw should be positioned and sized relative to the bounding box of the face.
- In the example above I drew the mouth using
cv2.ellipsewhich allows you to draw portions of an ellipse rather than the full ellipse (this is is useful for generating curves). - All arguments to the drawing commands should be in terms of pixels. The functions will complain if you specify floating point values, so be sure to convert your values to integers using the
intcommand. - It helps to draw a diagram of each of the shapes you will use to make the face and how they align with the face box.
(optional) Defacing a video
Modify the line of code cap = cv2.VideoCapture(0) to instead
load a video (for instance cap = cv2.VideoCapture('/path/to/my/video.mp4')).
The results can be quite funny. If the video runs too slowly, try processing every 5th frame (where you can adjust 5th to whatever you want to achieve the desired frame rate).
Turning in your toolbox assignment
To turn in your assignment, push your code to GitHub. You should schedule a quick NINJA meeting to show off your work in action!